
Building a cat tree yourself is actually way more doable than it seems, and it can save you a good chunk of cash. This guide is here to help you with DIY cat tree ideas, what you’ll need, and how to make one that’s practical, fun, and goodlooking in your space. Whether you’re working with leftover wood, repurposing furniture, or starting totally from scratch, a custom cat tree is a cool project for cat lovers with a little bit of time and a small budget.
Why Build a DIY Cat Tree?
Custom cat trees let you suit your cat’s personality and your home style. Commercial cat trees can get expensive, especially if you want one that doesn’t look out of place in your living room. Buying premade also means settling for materials and shapes the manufacturer chose, which aren’t always sturdy or attractive. By making your own, you pick the colors, size, shape, and attachments, and you can save quite a bit.
The finished project is usually more personal, and your cats get something built just for them. Plus, it’s pretty satisfying to see your cat enjoying something you created. It’s also a nice excuse to use up odds and ends from the garage or thrift store runs, keeping things sustainable.
DIY Cat Tree Basics: Planning and Supplies
Before starting your project, it helps to choose what kind of cat tree you want. Think about your available floor space, ceiling height, and how many cats will use it. Do you want a tall cat tower or something low and wide? Platforms for climbing, cozy caves for napping, or scratching posts are all elements you can work into your design.

- Wooden Planks or Plywood: For the base, platforms, and support poles.
- Sisal Rope: Really good for wrapping around posts to make sturdy scratching spots.
- Carpet Scraps/Faux Fur: These add comfort and grip for climbing or lounging.
- Brackets and Screws: To secure each level and for stability.
- Non-toxic glue or staple gun: Safe adhesives hold carpet in place.
- Power drill, saw, and basic tools: Makes cutting and assembly much easier.
Some people like to use items like PVC pipes for posts or even upcycle side tables or old bookcases. Anything that’s catsafe and sturdy can work.
Is It Cheaper to Build or Buy a Cat Tree?
In most cases, building your own is much cheaper than buying a readymade cat tree, especially when you want a larger multilevel model or anything unique. Storebought options can go from $60 for a really basic one, to well over $200 for a big, fancy tree. If you already have some of the necessary materials lying around, you might only spend $20$50 for supplies. Even if you buy everything new, your cost typically comes in under what a prebuilttree of the same size would be.
What’s cool about the DIY route is that you can decide how much to spend, and what to splurge or save on. Upcycling or using leftover timber cuts the budget even further. Plus, you still get a tree that matches your space and fits your cats’ needs.
How Tall Does a Cat Tree Need to Be?
Cats love height; they use it to watch their domain, stretch, and climb. A good starting point is a cat tree that’s at least three to four feet tall (about 1–1.2 meters) for most apartments and houses. If you’ve got the ceiling height (and your cats are climbers), you can build trees up to six feet or taller.
If you’re building for kittens, senior cats, or cats with mobility problems, it’s a good idea to keep the levels closer together or build a tree that’s shorter overall so it’s easier to reach each landing or hideaway. For active or adventurous adult cats, go as tall as your space (and ceiling stability) allows. Always anchor tall structures for safety.
How to Make an Easy DIY Cat Tree
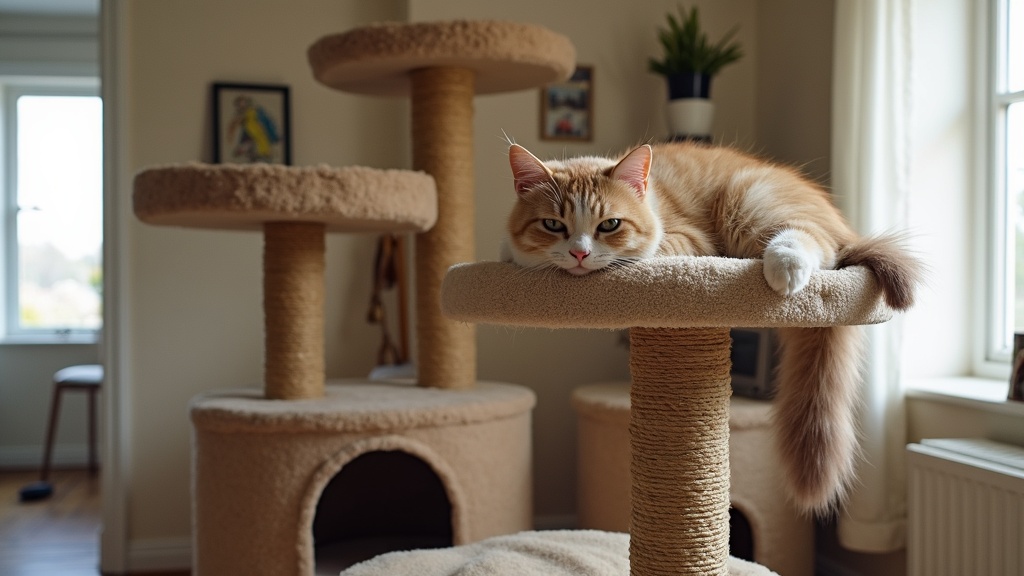
The simplest version uses a sturdy wooden base, a few posts (either wooden dowels or thick PVC pipes), and at least two platforms. Here’s a basic stepbystep process I’ve used:
- Cut Your Base: Use a square or rectangle of heavy plywood as the base (at least 18” across for stability).
- Attach Posts: Screw or bolt posts vertically into the base. Wrap posts in sisal rope, securing the ends with glue or a heavyduty staple gun.
- Add Platforms: Attach flat wooden planks partway up and at the top of the posts. Cover them with carpet remnants using nontoxic glue or staples.
- Make Extras (optional): Add a hanging feather toy, small hideaway box, or even suspended ropes or hammocks.
- Secure Everything: Always double check that screws are tight and all edges are sanded smooth. Wobbly cat trees are no fun. Cats will avoid unsteady furniture and that defeats the purpose.
This easy build doesn’t take much time and delivers a solid starter tree for one or two cats. If you want to get fancier, add more posts, some tunnels, or multilevel hideouts for your cats to stay interested. Creativity is definitely welcome when personalizing your tree, and you can check out different layouts as you go.
Cool DIY Cat Tree Ideas for Inspiration
- Bookshelf Cat Tree: Repurpose an old, sturdy bookshelf. Add cutouts for crawling, some sisalwrapped supports, and soft beds on each shelf.
- Branch and Rope Tree: Use a thick scrubbed branch or small trunk as a post, then attach wide wooden platforms. This gives a natural, rustic look and plenty for cats to scratch.
- WallMounted Climbing Wall: Attach shelves or boxes directly to a wall at different heights. Super spacesaving for apartments.
- Cube Storage Cat Condo: Stack carpeted cube storage units or sturdy crates and connect them with ramps or tunnels.
- Minimalist Tower: Use simple platforms spaced along a tall vertical post. Paint in neutral or bold colors to match your home style. For a minimalist look, stick to one color tone and keep the design clean.
Check out Pinterest or YouTube for lots of step-by-step plans and video builds from other cat owners for even more variety. You’ll usually stumble upon options for beginners and those with advanced woodworking skills. These resources lay out different approaches whether your focus is aesthetics, affordability, or just making life better for your furry friend.
How to Attract a Cat to a Cat Tree
Convincing your cat to use their new DIY cat tree sometimes takes a few tricks. Here’s what I’ve learned:
- Rub a bit of catnip or silver vine onto the scratching posts and platforms (most cats go wild for it).
- Move your cat’s favorite bed or blanket up onto the highest platform.
- Use toys; dangle a feather toy or drag a string from one level to another to encourage climbing and exploring.
- Put treats on different platforms to create a treasure hunt for your feline explorer.
- Give your cat privacy. If one section feels hidden or cavelike, shy cats are more likely to tuck in there and enjoy the new space.
Some cats jump onto new furniture right away, but if yours is hesitant, give them a few days to sniff things out. Don’t force or pick up the cat; let them get a feel for it at their own pace. Reward exploration with praise or a treat to reinforce positive vibes.
Common Mistakes and Safety Tips for DIY Cat Trees
Even a simple project needs a few safety checks. Here’s what I always look out for:
- Stability: Always check the base is wide and heavy enough to prevent tipping. Attach your tree to a wall for extra tall builds and avoid wobbly structures, since cats need to feel secure when climbing.
- Smooth Edges: Sand all sharp corners and check for exposed staples or screws. Anything sticking out can cause injuries, so give a careful onceover before letting your cat use the tree.
- Safe Materials: Avoid toxic glues, paints, or varnishes. When using carpet, skip anything with a strong chemical odor that could bother sensitive feline noses.
- Hardware: Use long screws or bolts instead of nails whenever possible. Cats are surprisingly hard on their furniture, and loose pieces can become hazardous in a hurry.
I always doublecheck each section can easily hold my cat’s weight and keep an eye on wear and tear. Replace worn sisal or platforms as needed, and take a look every few months to be sure everything is holding up. A yearly tuneup works wonders for keeping your homemade cat tree safe and fun for your cats for years to come.
Frequently Asked Questions
Is it cheaper to build or buy a cat tree?
Building your own cat tree often costs much less, especially for bigger or multifeatured trees. Upcycling materials keeps costs down even more. Storebought trees can get pricey fast, and you have more control over quality and design when you do it yourself.
How to make an easy DIY cat tree?
Use a solid plywood base, vertical posts wrapped in sisal rope, and at least two carpeted platforms. Secure with screws and brackets for a basic but durable structure. Add extra hiding spots or toys for enrichment and adjust the design as your cat gets used to it. Remember to keep all edges smooth and check stability often.
How tall does a cat tree need to be?
Three to four feet is usually plenty for most homes and cats, but taller is great if your cat loves to climb and your space allows. For kittens or senior cats, shorter trees or closely spaced levels are easier to steer through.
How to attract a cat to a cat tree?
Sprinkle catnip or silver vine, use toys and treats, and give your cat a few days to check out the new tree on their own. Place familiar items and bedding on the platforms, and let your cat set the pace as they explore.

Final Thoughts
DIY cat trees are super rewarding. Your cat gets a sturdy, fun playground, and you get creative control and savings. With so many design ideas out there, anyone can tailor a project to fit their space and their cat’s personality. A little time with basic tools and materials, and you end up with a unique, practical piece your feline will actually use. Jump into your own DIY adventure, and soon enough you’ll watch your cat climbing, scratching, and lounging in their new favorite place!
And if you want to get you inside cate some outside time along with their climbing time, then maybe you should consider a catio or catwalk so they can safely absorb some rays.


My cat Sky, has always been a laid-back cat, never really into climbing. While other cats might scale furniture, Sky preferred lounging in the sun. But after learning how expensive store-bought cat trees could be, I decided to build one myself. I kept it around 4 feet tall, easy to access, and made sure it was tailored to her.
At first, Sky was hesitant, but slowly, she started exploring. Soon enough, she was jumping from platform to platform, stretching, and even using the scratch posts. It turns out, with the right setup, Sky’s natural climbing instincts were awakened! Now, she loves her new perch, and I couldn’t be happier with how it turned out.
All thanks to this tip you gave! I had to come back and comment on your post; I bookmarked it. lol
It’s good to see you learned your girl was a secret acrobat. Many cats are more laid back and seem to enjoy sleep time more than the other more energetic types, but they may just be that way because they have nothing to allow them to utilize their natural agility.
I’m glad to hear you gave Sky the opportunity to do that and she eventually took to it like a fish to water. Thanks for the comment.
Best Wishes
Jason
This is such a fantastic and thorough guide! I love how you broke down the basics of building a sturdy, cat-friendly tree that’s also stylish and budget-friendly. The tips about stability and safe materials really stood out to me, so important for our curious furry friends!
I’m curious, for those of us with multiple cats of different ages and activity levels, do you have any favorite design tweaks that help accommodate both playful kittens and older, more relaxed cats on the same tree?
Thanks for the inspiration, I’m definitely feeling motivated to start my own DIY cat tree project now!
Hi Abby
You can definitely make a cat tree work for both active kittens and relaxed senior cats. The trick is to mix in different heights and features—low, wide platforms or cozy cubbies near the base for older cats, and taller climbing areas, ramps, or dangling toys up higher for the younger ones. That way, everyone gets their own “zone” without having to compete.
One design tweak I love is adding gentle ramps or carpeted steps between levels instead of only vertical jumps. This helps less mobile cats reach higher spots without strain, while still giving the younger ones a reason to climb and play. You might also consider padded edges or memory-foam mats in lounging spots for extra comfort. Pinterest has some great “multi-cat tree” layouts you could adapt to your space.
If you do end up building it, I’d love to hear how it turns out—or see pictures! And of course, if you run into any questions along the way, just drop me a comment and I’ll help however I can.